The humble English muffin is a workhorse at the breakfast table. Think of your favorite way to ease into the day, and there’s a good chance an English muffin is involved.
Most Americans don’t make their English muffins at home, which may have to do with the food’s origins in this country. Samuel Bath Thomas, an Englishman, immigrated to New York City in the late 19th century, bringing with him a recipe for his mother’s muffins. These muffins were similar to traditional English crumpets in some ways, but Thomas’ muffins used sourdough starter for leavening, rather than baking powder, and he cooked them on both sides, rather than only one side. (Many people don’t realize that English muffins are “dry-fried” on the stovetop, like a pancake, rather than baked in the oven.)
When Thomas opened his bakery in New York, not long after arriving there, his muffins sold like…well, hot cakes. The perforated edges, dusty bottoms, and “nooks and crannies” became the hallmark of English muffins in the U.S. And because Thomas’ did such a good job, most Americans simply bought their English muffins and left the work of making them to the experts.
Interestingly, even if folks wanted to try Thomas’ recipe at home, they wouldn’t have access to it. To this day, the procedure for achieving those wonderfully craggy English muffins is a fiercely guarded secret. It’s reported that the Thomas’ English Muffins recipe has been split into several parts for safekeeping, and is only held by a grand total of seven people.
Not to worry: we’ve done the heavy lifting to recreate Thomas’ family recipe. Chances are you’ve never tried making English muffins at home, so we’ve developed a play-by-play tutorial to ensure that your first batch of English muffins stands up to — and surpasses! — commercial varieties. Take these tips and apply them to our finely tuned English Muffin recipe, which is a fun culinary project for a lazy weekend morning or special occasion.
Get ready to work with a different kind of dough.
English muffin dough is different from many other doughs in that it is very soft, loose, and sticky. This accommodates a nice rise with lots of bubbles and caves in the final product, but it can have you scratching your head if you’ve never made English muffins before. Dust your hands and workspace with flour, go slow, and be patient.
Pop the dough in the fridge overnight.
Our recipe will produce wonderfully soft English muffins in under four hours, from start to finish. But if you want a slightly tangier result, closer to breakfast time, put the dough in the fridge overnight for the first rise. Then, when you wake up, you’re already more than halfway through the recipe.
Weigh the dough for evenly sized muffins.
A simple, easy way to ensure your muffins are all the same size? Cut and weigh each piece of dough after the first rise. Ball the chunks of dough like you would a bread roll, and let them sit for the second rise.
For best results, use the stand mixer.
It’s possible to make these English muffins using just a bowl, a wooden spoon, and some elbow grease, but a stand mixer fitted with a dough hook makes for a much smoother, more elastic dough.
Don’t be stingy with the semolina.
Dusting the English muffin dough balls on both sides with cornmeal, semolina flour or farina is a must. Doing so keeps the dough from sticking to the pan, but it also provides a bit of distance from the pan, too. This allows for indirect heat that will cook the interior of the muffin without burning its exterior. As the dough sinks into the flour, it hits the butter to create a tasty, chewy crust.
Go for the griddle.
You can use any kind of pan to cook your English muffins, but a cast-iron griddle maintains an especially nice, even level of heat. Otherwise, grab a cast-iron skillet, electric griddle, frying pan, etc. Any one of these tools will work.
Keep it low and slow.
Locking in the right heat level to cook your English muffins can be tough. Keeping the heat low is critical for the muffins’ ability to cook and puff thoroughly, and so that the bottoms don’t burn. In our testing, we’ve noticed that griddles and pans can also accumulate heat throughout cooking a batch of muffins, becoming hotter and hotter as time passes. So how can you tell your muffins are fully cooked inside? An instant-read thermometer inserted at the center of a muffin should register about 200°F, but if the exterior is already toasted, pull the muffins from the griddle. Pop them in a preheated 350°F oven for about 10 minutes. This will ensure that your muffins are fully cooked.
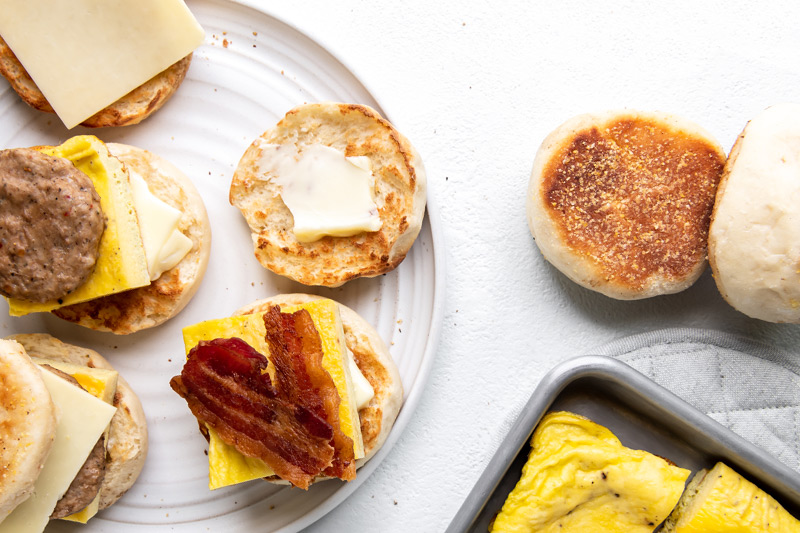
Use a fork, not a knife, to open an English muffin.
The idea behind Thomas’ perforated muffins was to pull the two halves apart, thereby leaving a roughly textured interior where melted butter can pool. When you use a knife, that cragginess is lost. To perforate your muffins, poke the tines of a fork laterally into the edge of each muffin, and continue all the way around the circumference. When you’re ready to split the muffin in two, slip the tines in again and gently pull one half from the other. This will never be a perfect division — the idea is to keep the interior rough so butter, jam, or whatever you choose to put inside has somewhere to go.
Keep the extras.
Got extra muffins? Not a problem. Place split muffins in a freezer-safe zipper bag, label it and freeze it. When you want to use them, thaw the English muffins in the microwave, or pop them directly into your toaster. Muffins can be frozen for up to six months.
Baking English muffins is only the beginning. Start with our Homemade English Muffin recipe, and once you’ve mastered these tasty yeasted treats, take the creativity up a notch. We’ve got you covered with recipes for Breakfast Pizza Muffins, Croque Monsieur English Muffins, and Sweet and Savory Breakfast Muffins, made with maple syrup, cinnamon, bacon, and butter, of course.